Is Hyperthreading Worth It? (Pros, Cons)
Hyperthreading improves CPU’s performance and speed but is hyperthreading worth it? Learn about hyperthreading here and its pros and cons.
Building a computer requires the handling of many delicate devices. Unfortunately, it’s rather common for people to accidentally mishandle their CPU and cause damage in the form of bent pins.
CPU socket pins are extremely fragile and prone to being bent. As long as your CPU pins aren’t completely broken off, there’s hope they can be repaired. I’ll show you exactly how to fix bent CPU socket pins. In addition, there are several different options when it comes to realigning your pins.
The all-important pins on a CPU provide the connection needed to link the CPU with a motherboard. Bent pins will sever this connection and render your CPU defective.
In this in-depth guide, I’ll discuss:
Let’s get started.
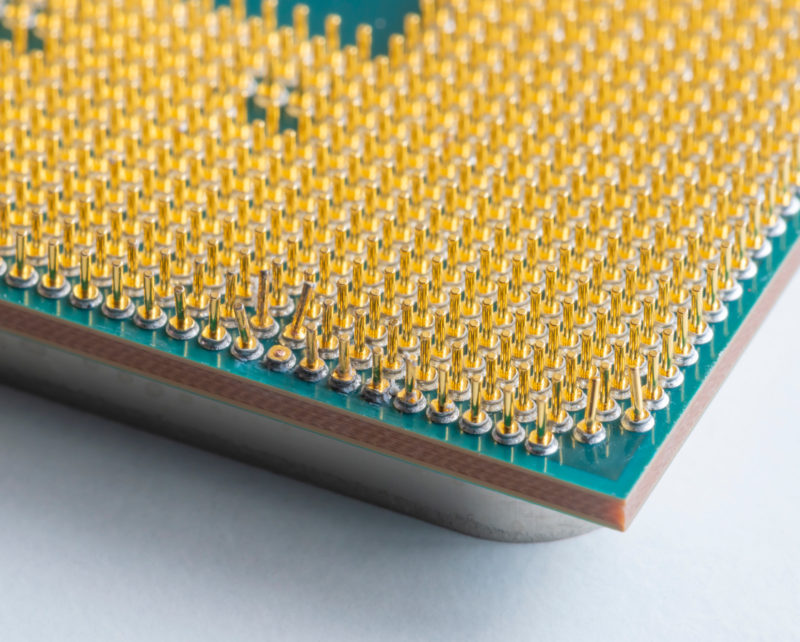
There are roughly 1,000 or more tiny little pins on each CPU socket. Most CPU pins are made from gold-plated copper, which are very soft metals. For this reason, a single drop of your CPU or inserting the CPU into the socket incorrectly can easily bend the pins.
Furthermore, if you bought a used CPU, the sender may have packaged it incorrectly causing bent pins.
When it comes to the symptoms of bent CPU pins, they can manifest themselves in any number of ways. Your computer failing to turn on altogether or being unable to detect memory inserted into certain slots are a few common issues.
The reason for this is that every CPU pin has a slightly different function.
That’s why the symptoms of a bent CPU pin can be as obvious as the system not turning on, or as subtle as slightly less stability when your PC is heavily overclocked. Learn how to check if your CPU is overclocked here.
Either way, the bent CPU socket pin can and needs to be fixed.
The answer is most likely not.
Physical damage usually isn’t covered by any manufacturer and they typically consider socket damage as physical damage.
Furthermore, it’s common for manufacturers to charge hundreds of dollars to fix bent and damaged CPU socket pins.
It’d be better to buy an entirely new CPU than trying to get it fixed. However, you can call or write to the manufacturer and check your warranty before.
Nevertheless, it’s very possible and simple to fix your bent pins right at home.

Now, I’ll go over the easiest ways you can repair your bent CPU pins.
Regardless of which technique you choose, I recommend using:
Furthermore, you should always hold a CPU at the sides or edges when maneuvering it. Check this guide on how you can safely remove a CPU from a motherboard.
Touching the top of the CPU (flat grey heat spreader) transmits finger oils which could potentially lower the efficiency of the thermal paste.
Touching the bottom of the CPU (contacts) transmits finger oils which can interrupt the connection between the pins and socket.
The mechanical pencil method is ideal if you have a few individual pins that are bent out of place, but not too severely.
Find a mechanical pencil, take out all the lead, and see if the opening fits snugly around a CPU socket pin.
If the mechanical pencil fits, place the tip of the mechanical pencil over the bent CPU pin and gently shift the pin back into the correct position. Make sure the pin is aligned properly with the other pins on the socket.
Repeat step 2 on each bent CPU pin. Be sure to act with caution and don’t bend any individual pin too many times as it can snap.
Once you’ve moved your CPU pins back into place, re-insert your CPU into the motherboard to check if everything is working properly. The CPU should fall into the CPU socket without any pressure required. Never forcefully push your CPU into the socket. If the CPU pins don’t find their holes immediately, be sure to inspect the CPU again before inserting it.
The sewing needle method is best suited for pins that are hooked and can’t be swallowed by a mechanical pencil. Once again, be sure to act carefully and avoid touching the other pins on your CPU.
Find a sewing needle that fits between two CPU pins. You can use a toothpick or any other thin and sturdy device if there aren’t any sewing needles in your home.
Delicately slide the sewing needle underneath your bent CPU pin without scratching your CPU.
Slowly pull the needle upwards to shift the bent pin back in place.
Repeat steps 2 and 3 for every hooked CPU pin. Furthermore, you can use a mechanical pencil for better accuracy once the pin is moved into a position where the pencil fits.
Re-insert your CPU and boot up your computer to check if everything is working now. Remember to carefully insert your CPU back into the socket and let it naturally fall into place.
The credit card method works best if you have rows of bent pins on your CPU socket.
Find a sturdy table and place your CPU on it with the pins facing up. Be sure to grab the CPU by its edges.
Then, find a high-quality credit card, gift card, or ID card. Just make sure the card you use isn’t too flimsy.
Next, locate a row on your CPU socket that has bent pins.
Gently nudge the row of bent CPU pins back into place. Be careful not to overbend the other CPU pins in the process. If some individual pins require more alignment, take your mechanical pencil to move it into the right position.
Plug the CPU back into the motherboard and see if everything works.
Similar to sewing needles, tweezers are great at fixing severely bent pins. The goal is to maneuver the pin into a position where a mechanical pencil or credit card can finish the job.
Locate the severely bent CPU pin and place the tweezers around it.
Gently pull the CPU pin into a position where a mechanical pencil or credit card can further correct it.
Repeat step 2 for each severely hooked CPU pin.
Use an empty mechanical pencil, credit card, or utility razor blade to move the bent pin back into its proper position.
Reinsert your CPU, turn on your PC, and check if everything is working.
If you’re not careful when repairing your bent CPU pins, it’s possible that you snap off a pin.
In this situation, you have two different options. You can either solder a replacement pin back on or buy an entirely new CPU.
For this reason, I urge you to be as cautious and gentle as possible when you’re handing your CPU.
We also have an article here on how you can test a motherboard without a CPU that you might be interested in.
Although bent CPU socket pins can be annoying to deal with, they are easily fixable with equipment you can find right at home.
Let us know in the comments below which method you picked and if you were able to fix your bent processor pins as well.
When you purchase through our links, we may earn an affiliate commission at no additional cost to you.