Best PC Case for Watercooling in 2023

Atif Liaqat | Last Updated On January 3rd, 2023

Watercooled PCs are cool! No doubt about it. They are the pinnacle of modern day high-end PC builds. They offer users better cooling performance along with new customization features.

However, building a custom water cooled PC (even a quiet PC or an open air PC) is not all sunshine and rainbows, it takes more time and effort to get a DIY water cooling build in proper working order. The stakes are high and there are a lot of variables involved. If you manage to screw up you could easily damage an expensive component.

Water cooled PCs require a lot of special parts but the first one you need to consider is the case. You need to make sure that you have enough room for all the reservoirs, fans and tubing while also setting them up in such a way that they don’t interfere with the overall aesthetic.

To help build your own DIY water cooled PC or, to start getting your feet wet with AIO components, I’ve searched the internet to find out the best PC case for watercooling, along with some honorable mentions.

Quick PC Cases Recommendations for Watercooling

Award Model Price
Best Budget Case for PC Case for Watercooling MSI MPG Series GUNGNIR 110R Check Price Read Customer Reviews
Budget Case Runner Up for PC Case for Watercooling MUSETEX Computer Case Check Price Read Customer Reviews
Most Expensive Mid-Tower for PC Case for Watercooling ASUS ROG Strix Helios Check Price Read Customer Reviews
Most Expensive Runner Up for PC Case for Watercooling Corsair Crystal 570X Check Price Read Customer Reviews
Largest Case for PC Case for Watercooling Corsair Obsidian 1000D Check Price Read Customer Reviews
Largest runner up for PC Case for Watercooling Thermaltake Tower 900 Check Price Read Customer Reviews
Personal Favorite for PC Case for Watercooling Thermaltake Core P90 Check Price Read Customer Reviews
Best Case Overall for PC Case for Watercooling Cougar Panzer Max Check Price Read Customer Reviews

The Best PC Case for Watercooling

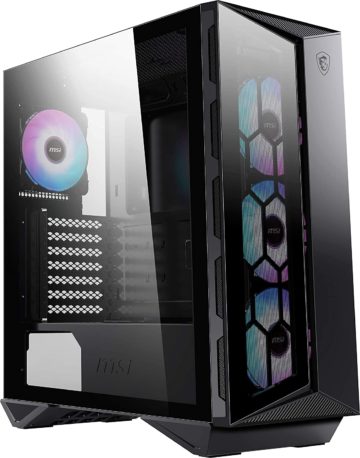
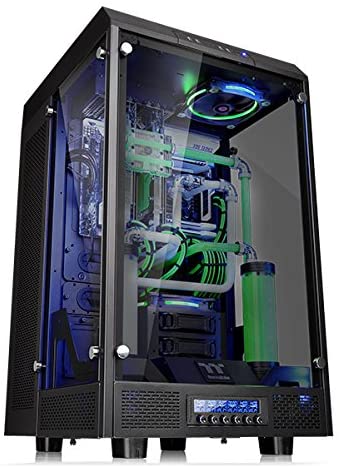
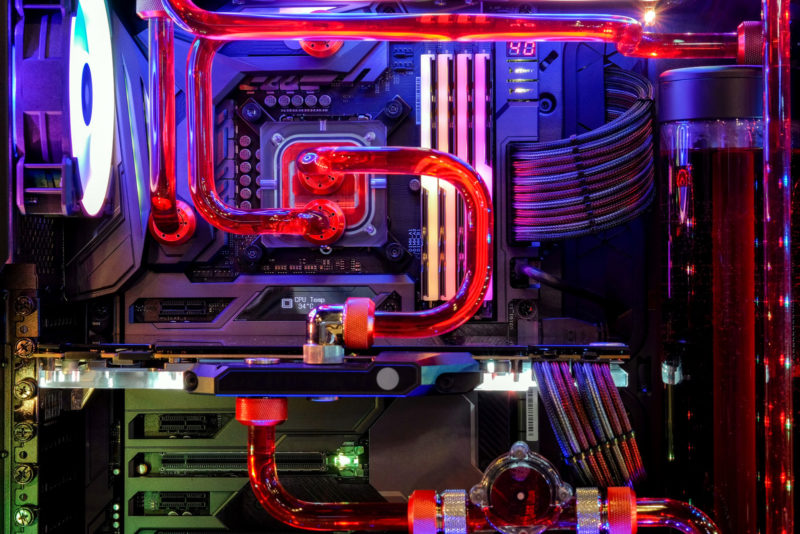
MSI is a brand we all know and love, but for most budget gamers, MSI product prices can be a bit overwhelming. In this “case”; we can make an exception. It’s got a good price for a premium Mid Tower. It looks very sleek, has enough space for radiators and comes with four ARGB fans. I Highly recommend this for a budget water cooling build. 

Check Latest Price
  • Case Type
    • Mid Tower
  • Dimensions
    • 17 x 8.4 x 17.7 inches
    • 13.39 inch GPU support
    • 2 x 2.5”/3.5” drive bays
  • Compatible Motherboards
    • Upto ATX
  • Weight
    • 20.1 lbs
  • Radiator support
    • 1 x 360 mm Front
    • 1 x 240 mm Top
    • 1 x 120 mm Rear
  • Front IO Panel
    • 1 x USB 3.2 Type-C
    • 2 x USB 3.2 Type-A
    • HD Audio
    • In-built LED controls button (Insta Light Loop)

Review

The GUNGNIR 110R is a strong and beautiful case, it’s not too expensive but it has a premium look and feel to it. I love the overall triangular design, it gives the case a very sharp and intimidating appearance. On the side you’ve got a tempered glass side panel along with four ARGB 120mm fans, which can also be controlled by a button at the front IO panel.

This case supports liquid cooling as per it’s specs, and because of this it can support a 360mm radiator at the front, a 240mm one at the top and a 120mm one at the bottom. Inspired by Odin’s legendary spear, the Gungnir, this case has great value for money and has enough space for many AIO/DIY water cooling components.

What We Like
Price - Compared to most other builds in this list, this is a very cheap option, but don’t be fooled by the price tag. MSI is a well-known reputable brand and their products have a very durable and premium build quality.
Aesthetics - I’ve said it before, this case looks amazing. I really love the spearhead design and the triangular pads at the bottom. Coupled with some matching ARGB configurations, it’s definitely going to turn heads. 
Know Before Buying
Dimensions - This is a mid tower case and although, you can fit a 12” long 2080 Ti for your 144Hz gaming experience you won’t have enough room to showcase your reservoirs or other large components, especially if you choose to go for a DIY liquid cooling build. For conventional AIO liquid cooling kits, this will work just perfectly.
Check Latest Price

The MUSETEX case, although not a very well known brand, provides a cheap alternative to water cooling cases. It’s all-white color scheme makes it look larger than life, and the six ARGB fans that already come with support for the motherboard are a most welcome feature. Along with that this case’s most impressive attribute: an affordable price tag.

Check Latest Price
  • Case Type
    • Mid Tower
  • Dimensions
    • 17.7 x 8.3 x 17.6 inches
    • 14.9 inch GPU support
    • 3 x 2.5”/3.5” drive bays
  • Compatible Motherboards
    • Upto ATX
  • Weight
    • 18 lbs
  • Radiator support
    • 1 x 120 mm Top
    • 1 x 120 mm Rear
  • Front IO Panel
    • 1 x USB 3.0 Type-A
    • 2 x USB 2.0 Type-A
    • HD Audio

Review

The MUSETEX Computer case is cheap enough and has adequate space for most AIO cooling components. However, I just can’t stand the all-out white color scheme, it makes the case look like it’s built from cheap plastic; plastic that could break at any time. The six ARGB fans which can be controlled by the motherboard is the only aesthetic feature that redeems it’s bland color scheme.

It’s got a tempered glass side panel and large rubber bushes in the bottom. It’s good enough for a DIY watercooled loop, provided that you get the proper parts.

What We Like
Price - This case is affordable enough, but it’s still slightly more expensive than the GUNGNIR and that’s why this case didn’t make the cut. The price is too much for this kind of quality.
Know Before Buying
Aesthetic - In my opinion this is a cheap case and they do an awful job of hiding it. The entire case looks like a cheap toy, one that a kid might play for one day and throw away the next. The all-out white color scheme may be something you are looking for, but for me, it is just appalling. 
Dimensions - This case has got more space than the GUNGNIR 100R but still you should be careful when trying to build a DIY liquid cooling loop, as a larger GPU and motherboard won’t leave you with enough space for the other components. Even if you decide to use AIO components you could still run into these same issues, so keep that in mind.
Check Latest Price

Want to impress your friends with an expensive build? This case has got it all. The ROG Strix Helios is a top-of-the-line premium case that came fully prepared. Whether it’s air cooled or liquid cooled, it's got enough space to support multiple GPUs along with all the other liquid cooling components that you may need.

Check Latest Price
  • Case Type
    • Mid Tower
  • Dimensions
    • 22.24 x 9.8 x 23.26 inches
    • 17.7 inch GPU support
    • 2 x 2.5”/3.5” drive bays
    • 4 x 2.5” bays
  • Compatible Motherboards
    • Upto EATX
  • Weight
    • 38.6 lbs
  • Radiator support
    • 1 x 420 mm Front
    • 1 x 360 mm Top
    • 1 x 140mm Rear
  • Front IO Panel
    • 1 x USB 3.2 Gen 1 Type-C
    • 4 x USB 3.2 Gen 1 Type-A
    • HD Audio
    • LED control buttons

Review

The ROG Strix Helios is a beast of a machine, it’s got a lot of space for a Mid Tower and a ton of cool new features: such as three tempered glass panels, an aluminum frame and an integrated Aura Sync RGB for the front of the case.

What I like most about this case is the ability to mount the GPUs in both the standard horizontal orientation or the unconventional vertical orientation.

If you’re looking to build a high performance rig with a 3080 I’d highly recommend this case, and while you’re doing so, make sure you’ve got the best PSU to go along with it.

What We Like
Dimensions - This case may not be the largest but it will definitely be more than enough for most of your DIY water cooled builds. There’s a lot of leeway for the GPUs so, you can easily showcase your reservoirs/tubing arrangements and all the other liquid cooling components without bargaining for space.
Aesthetics - The case has a lot of cool features and I really love the integrated RGB at the front. The case also provides a lot of customization and hence a lot of freedom to easily integrate a DIY/AIO liquid cooling kit into the mix.
Know Before Buying
Price - This case is cool and all, but many people shy away from it because of it’s insane price. Most of us won’t be able to afford it but, if you can, it’s definitely worth the money. All the extra features provide a ton of utility that you will actually get the chance to use. 
Check Latest Price

The Corsair Crystal 570X is a solid option, it’s got enough space and a unique design of four tempered panels covering all sides (except the rear). Everything is on full display, and in this case; there’s nothing to hide.

Check Latest Price
  • Case Type
    • Mid Tower
  • Dimensions
    • 18.8 x 9.2 x 20.1 inches
    • 14.5 inch GPU support
    • 2 x 2.5” drive bays
    • 2 x 3.5” bays
  • Compatible Motherboards
    • Upto ATX
  • Weight
    • 24.03 lbs
  • Radiator support
    • 1 x 360 mm Front
    • 1 x 240mm Top
    • 1 x 120mm Rear
  • Front IO Panel
    • 2 x USB 3.2 Type-A
    • HD Audio

Review

The Crystal 570X has a good build quality. I really love the rectangular design with four tempered glass panels, this type of case achieves a perfect balance between portability and the ability to be used as a showcasing device.

The case isn’t as expensive as the Strix Heliox because it doesn’t have a lot of the extra bells and whistles attached to it. But overall, it’s a large sturdy case; with a hefty price tag attached to it.

What We Like
Aesthetic - The rectangular design with the four tempered panels is a welcome change. Corsair made some bold moves with this design without straying too far off. I believe that it was specifically designed to be used alongside corsair’s AIO liquid coolers. But still, it can also be used with a conventional DIY water cooling kit. 
Know Before Buying
Price - The price is a bit too steep for me, it doesn’t offer anything revolutionary except for the 4 glass panels, because of this price, I’m a little hesitant to recommend this for budget builders. But if you fancy this case, I won’t stand in the way, just remember that there are a lot more cooler cases with better features. 
Dimensions - This case isn’t that large either, so it can get a bit tight, trying to pull off a custom loop water cooling build, especially without the right parts and know-how can be a bit tricky.
Check Latest Price

The Obsidian 1000D is a sight to behold, it’s huge and it’s got that “glass tower monolith” look to it. With it’s four smoked tempered glass panels and integrated RGB this case towers above the rest, literally and figuratively. 

Check Latest Price
  • Case Type
    • Super Tower
  • Dimensions
    • 27.3 x 12.1 x 27.4 inches
    • 15.7 inch GPU support
    • 5 x 2.5”/3.5” drive bays
    • 6 x 2.5” bays
  • Compatible Motherboards
    • Upto ATX
  • Weight
    • 60 lbs
  • Radiator support
    • 2 x 480 mm front
    • 1 x 420mm top
    • 1 x 280 mm rear (fans only)
  • Front IO Panel
    • 2 x USB 3.2 Type-C
    • 4 x USB 3.2 Type-A
    • HD Audio

Review

This case is huge, there I said it. The overall design of this case looks like one solid block, and I love it. It’s got that same sharp, futuristic look that the GUNGNIR 110R had going for it, but this case has a larger and more polished appearance and it’s also great for showcases but, it’s not very portable.

If you’re looking to create an amazing dual GPU, fully high-end, legendary status DIY custom water cooled gaming PC; then this case is right up your alley.

What We Like
Dimensions - This case takes the top rank when it comes to space, it’s a huge case with enough room for all your custom liquid cooled components. You can have thick radiators on here without them getting in the way of the motherboard or the GPU.
Aesthetics - This case is made for those PC enthusiasts who are more interested in building PCs than using them. The rectangular design provides the user with more creative freedom as there’s a ton of space inside. 
Know Before Buying
Price - This case is again, highly expensive but worth the extra space. If you’re not worried about a PC case burning a hole in your wallet then by all means, be my guest; it is definitely not “free” real estate.
Check Latest Price

Thermaltake’s Tower 900 is just massive. It’s built as a more showcase-focused PC case than being an actual day-to-day, average Joe’s gaming PC. It’s a very impressive case, but not everyone will recognize this for what it actually is, your grandpa might mistake it for a fish tank.

Check Latest Price
  • Case Type
    • Super Tower
  • Dimensions
    • 19 x 16.7 x 29.6 inches
    • 15.7 inch GPU support
    • 1 x 5.25” drive bay (Accessible)
    • 6 x 2.5”/3.5” drive bays (Hidden)
    • 2 x 2.5” bays (Hidden)
  • Compatible Motherboards
    • Upto E-ATX
  • Weight
    • 54 lbs
  • Radiator support
    • 2 x 240/120mm top
    • 4 x 140/120mm left
    • 4 x 140/120mm right
    • 2 x 140/120mm rear
    • 1 x 140/120mm HDD cage
  • Front IO Panel
  • 4 x USB 3.2 Gen 1 Type-A
  • Mic In
  • Audio Out

Review

Ah yes! A terrarium for a PC. Right off the bat you can tell that this case’s primary function is to showcase DIY liquid cooling builds. There’s even a certification given to this case by Tt LCS (although it is just Thermaltake congratulating their own products).

Overall this isn’t very expensive and it’s not the largest either. It’s a bag of mixed emotions for me when I see this case and anybody who dares to buy it.

What We Like
Aesthetics - Thermaltake definitely got that part right, this is a bold new look for a gaming PC and they’ve succeeded in making a new case that’s best for showing off liquid cooling builds. The fans at the front have been swapped out for fans in the sides, to allow for more tempered glass windows. It doesn’t have any integrated RGB functionality and it doesn’t need any, because that's not the point.
Dimensions - This case isn’t as big as the Obsidian 1000D but it’s actually got enough space to play around with different loops and configurations. The customization on this case is amazing: there’s tons of modular features including a modular drive bay. 
Know Before Buying
Price - This case isn't as expensive as I thought, but still, it’s got a significant price tag. Thermaltake definitely capitalized on this new design and marketed it as a showcase PC built specifically for liquid cooling. I don’t think the price is unreasonable but for budget users, I don’t recommend it. 
Check Latest Price

The Thermaltake Core P90 looks weird, and I love it. The components are all over the place but this bold design allows components to be given extra special attention. Because of this it is more favored towards liquid cooling, and the case is very well planned out in order to make sure that there's enough space for tubes to move around conveniently.

Check Latest Price
  • Case Type
    • Mid Tower
  • Dimensions
    • 18.5 x 18.5 x 24.2 inches
    • 12.6 inch GPU clearance
    • 3 x 2.5” drive bays (Accessible)
    • 2 x 2.5”/3.5” drive bays (Accessible, optional)
    • 2 x 2.5”/3.5” bays (Hidden)
  • Compatible Motherboards
    • Upto ATX
  • Weight
    • 37.9 lbs
  • Radiator support
    • 1 x 480mm Right
    • 1 x 420mm Right
  • Front IO Panel
    • 2 x USB 3.0 Type-A
    • 2 x USB 2.0 Type-A
    • Mic In
    • Audio Out

Review

The Thermaltake Core P90 is nothing like any of the other cases in this list, it’s hexagonal, prism shape makes it very difficult to pin-point where each and every component is located.

Despite the open-chassis design there’s still some form of protection provided by the two tempered panels, one that covers the motherboard, GPU and PSU while the other side covers the radiator/fan combo.

This case, although it looks like it provides great airflow, is not suitable for air cooling. It’s made specifically for AIO/DIY liquid cooling builds and, I think it looks better with a custom DIY liquid cooling loop than stock AIO components.

There’s a lot of customization allowed in this case with a ton of modular features. It can be mounted on a wall, placed vertically or horizontally. The GPU and PSU can also be mounted vertically.

They’ve also got the Tt LCS certification although I’m not sure who they are trying to fool with their own made-up certification.

What We Like
Dimensions - There’s a lot of space and modularity to make sure that your components will fit inside this case. It can be a bit hard at first to figure out how everything fits, but once you get the hang of it, building and rebuilding PCs using this case is an absolute breeze.
Aesthetics - The concept is really amazing here, Thermaltake made another case to showcase their own liquid cooling products. The DIY liquid cooling system is the actual highlight of this case, the reservoir and tubing configuration for this case just looks amazing.
Know Before Buying
Price - For such an unorthodox case the price is expected to be a bit higher, and it is. This is obviously not for budget builds as it’s intended to be built around a liquid cooling configuration and it can also be mounted on a wall. So for those extra features, you’re going to have to pay more.
Check Latest Price

Cougar Panzer Max is the best of the bunch, reasonably priced with a ton of cool features. This is the go-to case for anybody interested in liquid cooling, whether it’s AIO or DIY, the Panzer Max got you covered.

Check Latest Price
  • Case Type
    • FullTower
  • Dimensions
    • 10.47 x 24.09 x 21.88 inches
    • 13.35 inch GPU clearance
    • 2 x 5.2”drive bay (optical disk drive)
    • 2 x 2.5”/3.5” drive bays
    • 4 x 2.5” bays
  • Compatible Motherboards
    • Upto E-ATX
  • Weight
    • 8.8 lbs (with a handle that can support 77lbs)
  • Radiator support
    • 1 x 360mm Front
    • 1 x 360mm Top
    • 1 x 120mm Rear
    • 1 x 120/140mm Bottom
  • Front IO Panel
    • 2 x USB 3.0 Type-A
    • 2 x USB 2.0 Type-A
    • Mic In
    • Audio Out
    • Fan speed control switch

Review

Even though it’s not my favorite, I love this case. It’s got a lot of utility and plenty of features for a mid-level build. The customization in this case is insane. It supports a variety of mobo sizes, 2 optical disk drives, 4 GPU slots and four SSDs/HDDs that utilize SATA cables. To know how many SATA cables you’ll need, check this article.

In terms of cooling, it has enough space for AIO radiators, however it can get a little tight inside, so you may need to be extra careful with DIY cooling kits.

The overall design is top-notch, they emphasize the utility of a militaristic theme while still making sure that it doesn’t look too bland or difficult to work on.

Overall this is the best case for getting started on watercooling.

What We Like
Aesthetics - The build quality and the utility is just perfect. The design looks strong, but beautiful. It’s got a personality of it’s own and it can easily blend to whatever color scheme you hope to integrate it with. 
Price - Though it isn’t by any means cheap, the Panzer Max offers great value for money, I love the extra utility and optional features this case provides, along with a very modular and versatile design. The amount of components I can fit into this case is amazing.
Know Before Buying
Dimensions - Although the case supports a lot of hardware, I believe that it is specifically designed for either air cooled or AIO water cooled components. It’s not impossible to integrate DIY liquid cooling so I suggest that you plan your DIY liquid cooling setup very thoroughly before you start working on this case.
Check Latest Price

What to look for when picking out a proper case

Nowadays most modern PC cases have a new spec that identifies if that case supports water cooling. Regardless of that spec, I recommend that you take the time to map out your loop beforehand and take note of several parameters to ensure that your desired build will fit inside your case.

Most air-cooled builds will only need case fans, these fans are at least 25mm thick and therefore, they take up relatively less space, but in a watercooled PC you have to include both the radiator fan and the radiator itself. Therefore, the space taken up by the radiator/fan combo is doubled and it could get even thicker if you buy a larger radiator. Yes! There are some “thicc” radiators out there, take note of that, and remember: not all thicc radiators will fit inside your case.

Starting off you might want to consider the radiator at the front of the case, and depending on your requirements, you might also want to add another radiator above the motherboard. Take some measurements of these areas and make sure that you have enough room. As a rule of thumb I usually like to confirm if there’s at least 50mm of headroom above the motherboard, this simple measurement will work wonders for you, especially down the line, when you feel like getting a “thicker” radiator.

Finally make sure that there will be enough space for the pump, reservoir and tubing along with all the other parts.

Maintaining your case

Every PC case needs some form of maintenance from time to time however, when it comes to water cooled PCs there’s more work involved. Most people love the aspect of water cooling PCs but because of it’s high maintenance requirement they tend to give up.

Periodic maintenance on a water cooled PC is crucial. Other than the fact that it helps maintain overall performance, you need to make sure that there are no leaks and corrosion. If there are any leaks, it could spell disaster for your PC. Leaks could damage the electronic components and short out the circuits; this could be an expensive problem to fix.

I’d recommend that you periodically check the performance specs of your cooling system along with visual checks to identify any leaks, cracks, discoloration or unnecessary deposits in the coolant. I would also suggest that you do this at least, once a month.

Building and maintaining a watercooled PC requires dedication but, when you weigh the pros and cons; it is absolutely worth it to go through all that extra trouble.

Advantages of a water cooled PC

lose-up and inside Desktop PC Gaming and Water Cooling CPU

Right now you’re probably worried that it may not be worth it to go through all that trouble just to build and maintain a water cooled PC. But bear with me, it will be all worth it in the end. There are certain advantages you can glean from a water cooled PC, advantages that are far more superior than it’s air cooled alternative.

Efficiency

Now many of you won’t bother with water cooled PCs if they didn’t have any edge over their air cooled cousins. In most high-performance builds, which utilize intense overclocking features, it is much more efficient to use liquid cooling.

The reason why liquid cooling is much more efficient than air cooling is because of the higher thermal conductivity of water. This property allows liquids such as water to absorb and dissipate heat more effectively, making them the go-to solution for high efficient cooling.

Low Noise

Most gamers, like myself, don’t mind the noise just for the simple fact that we can’t afford to do so. Besides, when you’re wearing 100-dollar gaming headphones you can barely hear anything else.

But for others, noise can become something of an issue. When a PC is running at full capacity the fans can get a bit annoying and therefore finding methods to reduce noise has always been a challenge, one which gamers love to contend with.

Most water cooled PCs do not require fans to run at very high RPM as most of the cooling work is done by the radiator, this is one of the reasons why these builds tend to run more silently than their air cooled counterparts.

Separate Cooling

Watercooled PCs offer a lot of customization in how you want to loop your coolant setup, it also provides the ability to deliver coolant to each individual component separately. This is done by attaching water blocks to CPUs, GPUs, motherboards and even RAM sticks.

Along with these separate water blocks, you can customize your loop and give priority to certain parts that you might consider to be far more vulnerable to overheating.

Aesthetics

Close-up Desktop PC Gaming and water cooling cpu with LED RGB light show status on working mode, interior pc case technology background

I’d be remiss if I didn’t mention aesthetics. The first thing that comes to my mind when I see a new water cooled PC is “How cool does it look? Compared to normal PCs”

Water cooled PCs definitely give a fresh new look to your PC. The tubes and coolant can be customized in so many colors and finishing. Couple that with ARGB features and you can build an awesome PC that looks cool and performs just as well.

Now you’ve got a better idea about the work involved in building and maintaining a DIY/AIO water cooled PC. Along with certain guidelines on how to find a proper case. Also, safety first, don’t forget to ground yourself when building your PC.

Conclusion

Best Budget Case for PC Case for Watercooling
Budget Case Runner Up for PC Case for Watercooling
Most Expensive Mid-Tower for PC Case for Watercooling

Getting started with water cooling is no easy feat, especially DIY builds. I recommend taking the time to ensure that the case you’re looking for supports the radiators and has enough space for all the other components in your cooling kit. It’s a tough job but liquid cooling is definitely worth it in the long run.

When you purchase through our links, we may earn an affiliate commission at no additional cost to you.